AUTOMATIC
Cleanliness inspection of on three-dimensional parts surfaces
FAST
Scan of the surface of various parts for organic contamination within a very short time
RELIABLE
Robust sensor
Reproducible measuring results
Flexible at the process and in he laboratory
| Quantity | Fluorescence intensity in RFU |
| Fields of application |
Cleanliness inspection before gluing, painting, coating, welding, hardening, bonding … Coating thickness inspection for corrosion protection oils, primer application before gluing ... |
| Use | Detection of oil, grease, cooling lubricant, parting agents … on parts and assemblies made of metal, ceramics and glass (only partially suitable for plastics) |
| Measurement | Contact free, non-destructive, in-line capable, thickness sensitive |
| Measurement monitoring | SITA fluorescence standards (standard scope of delivery) |
| Industry | Automotive, machine construction, mechanical engineering, medical technology, electrical engineering, surface technology, aerospace … |
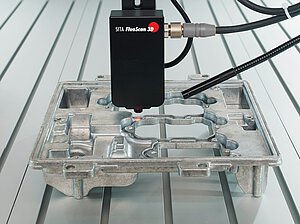
Automated inspection of die cast aluminium before bonding
In manufacturing processes of cast parts release agents are used. However, in subsequent processes such as the bonding of sealing grooves, release agent residues lead to insufficient adhesion of the bonding joint.
By inspecting the cleanliness of a sealing groove via Fluorescence measurement, the quality of the bonding joint is ensured.
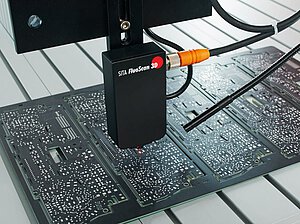
Inspection of printed circuit boards
To meet the high quality requirements of bonding and soldering processes, pads have to be free of organic contamination. By scanning the pads, cleanliness can be controlled to ensure the quality of the soldering or bonding process.
Defects can be identified at an early stage and thus, rejects and expensive system failures can be prevented.
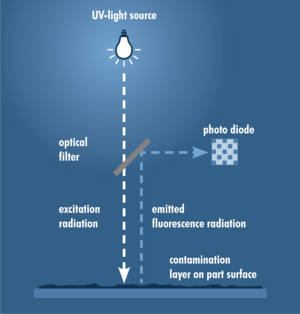
The measuring method uses the characteristic of organic substances to fluoresce. UV light is focused onto the surface. The contamination fluoresces. The intensity of the fluorescence increases with the layer thickness of the contamination. The intensity is measured in RFU (Relative Fluorescence Unit) in relation to SITA fluorescence standards.
The lower the measured value in RFU, the cleaner the surface.
| Fluorescence intensity | ||
|---|---|---|
| Measuring range | (0...2,000) RFU (Relative Fluorescence Unit) | |
| Max. measuring deviation | max. 0.5% of measuring range | |
(Kopie 13)
| 3-axis positioning unit | ||
|---|---|---|
| Table surface | 850 mm x 750 mm | |
| Traversing range (X-Y plane) | 475 mm x 475 mm | |
| Traversing speed | up to 120 mm/s | |
| Positioning accuracy | < 0.1mm | |
| Stroke (standard) | 75 mm (optional e.g. 150mm) | |
| Sensor parameter | ||
|---|---|---|
| Excitation | 365 nm, max. 150 mW | |
| Detector | 460 nm | |
| Measuring distance (Standard optics) | 4.7 mm | |
| Diameter measuring point (Standard optics) | 1 mm | |
| Ambient conditions | ||
|---|---|---|
| Acceptable surrounding temperature (storage / operation) | (-20...60) °C / (10...40) °C | |
| Acceptable ambient conditions | rel. humidity < 70 % | |
The software for SITA FluoScan 3D consists of three individual software components. They are included in the scope of delivery and can be used independently.
- Software FluoScan 3D
Comprehensive software for creating individual measuring sequences using Drag&Drop with predesigned functions - Software FluoScan 3D Result Viewer
Software for visualisation and evaluation of measuring data as well as for creating report templates for recurring data evaluation
Possible export of measing data as graphs or tables to Excel or complete reports as pdf-document - Software FluoScan 3D Runner
Execution of measuring sequences and report templates for automated measurement and data evaluation
 | Brochure SITA FluoScan 3D(606 KB) |
Simply get in touch with us. You can find the contact details of our sales and application department under contact persons.
For support in your country, please see our international sales partners.
Alternatively, send an e-mail to info@sita-messtechnik.de, call us at +49 351 288 53-0 or send us a message using the contact form.


